Configuring a Landscape
A Landscape defines how your services are deployed and connected. You can add Compute Runtimes (Reactives, Managed Containers, Cloud Native Deployments) and Managed Services, configure their resources, networking, and environment. For a deeper technical overview, see Landscapes & Workspaces.
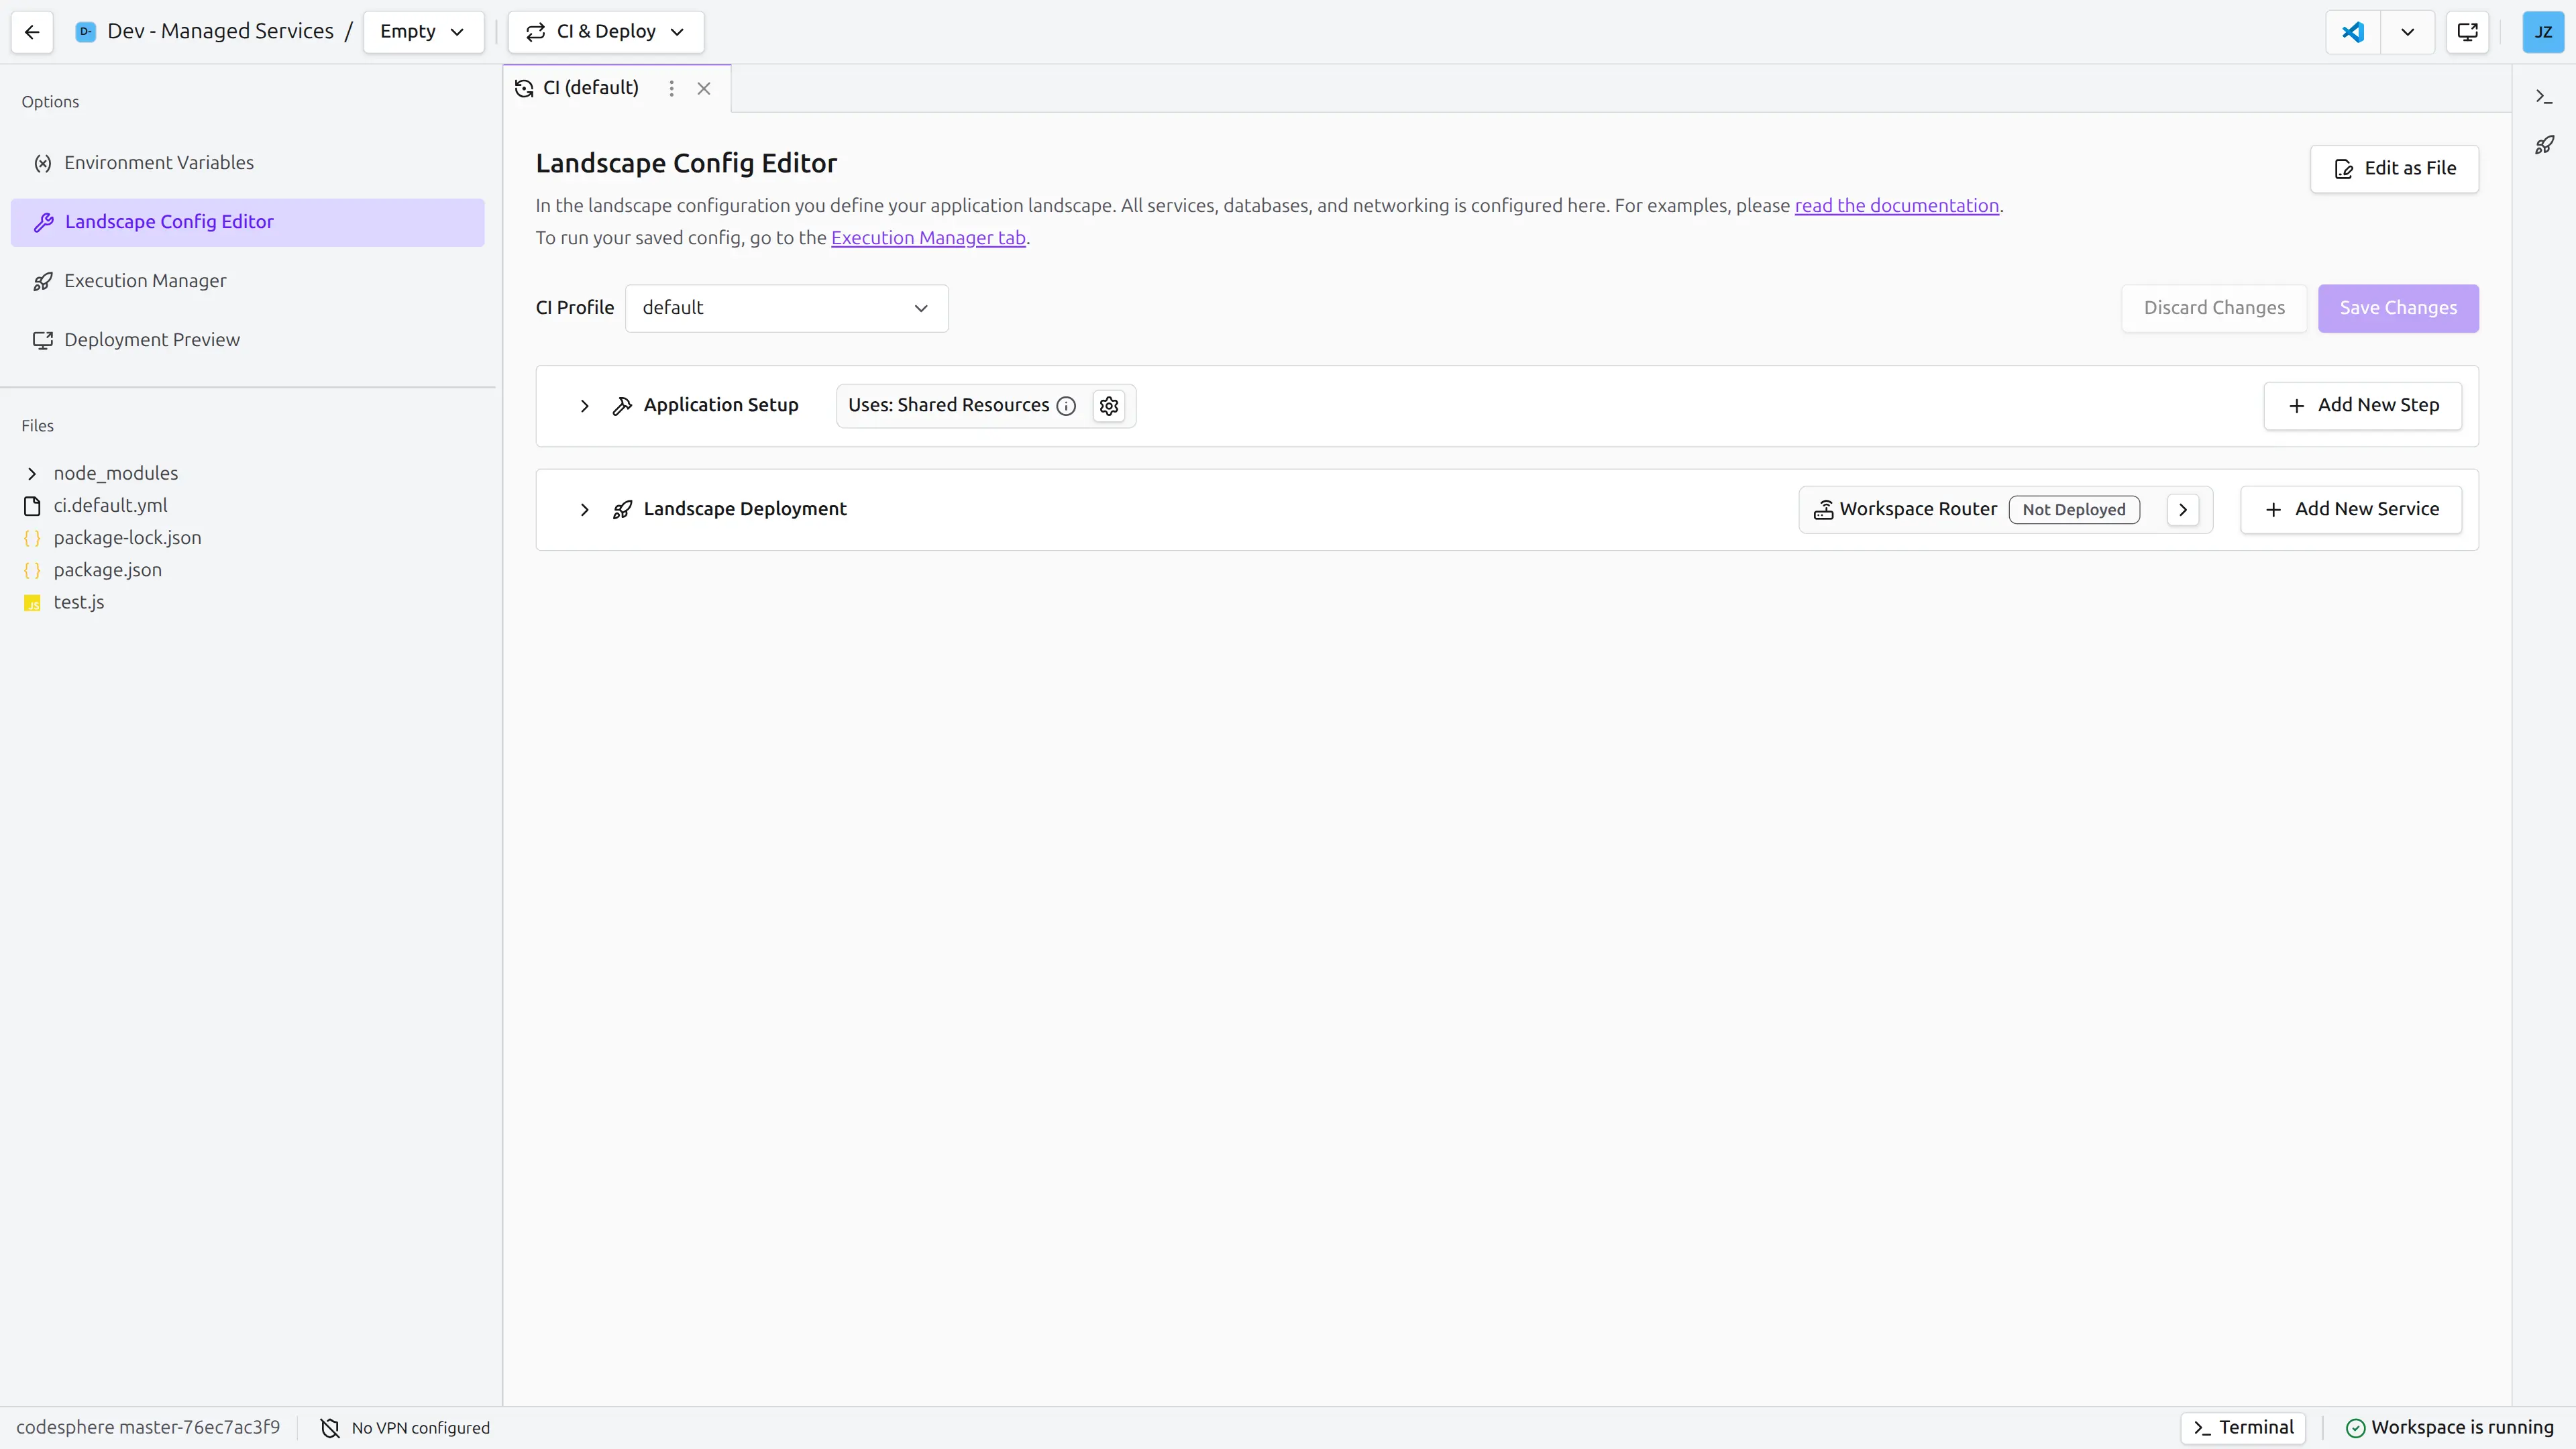
All configuration starts from the Landscape Config Editor:
- In your Workspace, select the CI & Deploy Workspace Mode in the top center dropdown.
- Click on the Landscape Config Editor in the left side panel.
- Ensure the correct CI Profile is selected (e.g.,
defaultordev). If you need to create one, see Using CI Profiles. - Click the + Add New Service button on the right side of the Landscape Deployment section and select the service type you want to add.
From here you can configure your Landscape using the visual editor or by editing the ci.yml file directly.
The landscape config UI behaves as one large form that configures your ci.yml file. You can only save the configuration in the top level of the form.
Codesphere Reactives
Codesphere Reactives are Codesphere's flagship runtime, best described as stateful serverless. They combine persistent filesystem access with automatic resource deallocation during idle periods and near-instant startup (milliseconds). For a detailed overview, see Runtimes.
To add a Reactive, select Reactive Service from the service type picker, then configure it using the sections below.
Runtime Config
- UI
- YAML
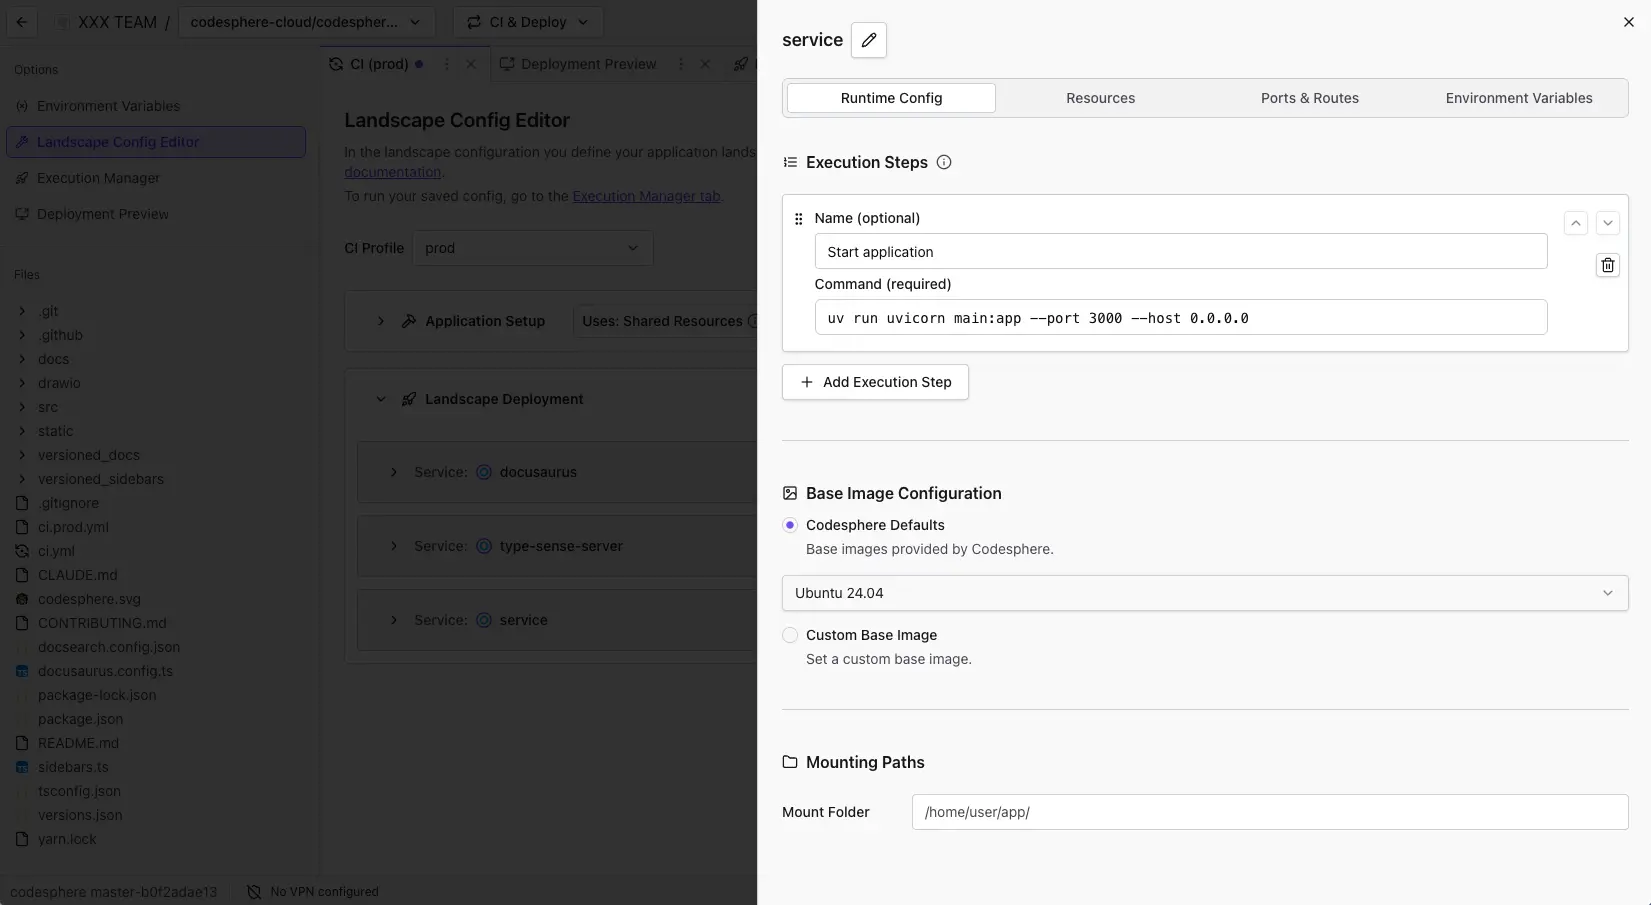
Execution Steps
Execution steps define the commands that run when your service starts. These commands execute sequentially and should start your application process.
To add execution steps:
- Click + Add Execution Step
- Enter a name for the step (e.g., "Start Server")
- Enter the command to execute (e.g.,
npm startornode server.js) - Repeat if additional steps are needed
The final step should typically be a long-running process (like a web server). If all commands exit, the service will be marked as unhealthy: The service is running, but its pipeline is no longer executing.
Base Image Configuration
Reactives use a shared, Codesphere-maintained Ubuntu base image by default (Codesphere Defaults). This image is pre-warmed and pooled for near-instant startup (milliseconds). You can customize the runtime environment by installing dependencies via Nix. There is also a Custom Base Image option available for advanced use cases, which acts as the basis for Managed Containers.
Mounting Paths
By default, all Reactive services mount the entire /home/user/app directory from the shared network filesystem. You can restrict a service to only mount a specific subdirectory using the Mounting Paths setting.
Use cases for mount sub paths:
- Isolate file access between services to prevent accidental overwrites
- Improve security by limiting each service's filesystem scope
- Organize multi-service architectures with dedicated directories
Only files written in /home/user/app are persisted to the network file system and shared across all services. Files written elsewhere exist only on the local disk of that specific pod and will not be available to other services or replicas. These local files are also lost across Workspace restarts which may happen due to scaling or Codesphere updates.
run:
  my-service:
    mountSubPath: uploads  # Only mounts /home/user/app/uploads
    steps:
      - name: Start Server
        command: npm start
- steps: List of execution steps, each with a
nameandcommand. Commands run sequentially at service startup. - mountSubPath (optional): Restricts the service to a subdirectory of
/home/user/app.
Example commands:
npm start— Node.js applicationuv run uvicorn main:app --port 3000 --host 0.0.0.0— Python application./gradlew bootRun— Spring Boot application
Resources
- UI
- YAML
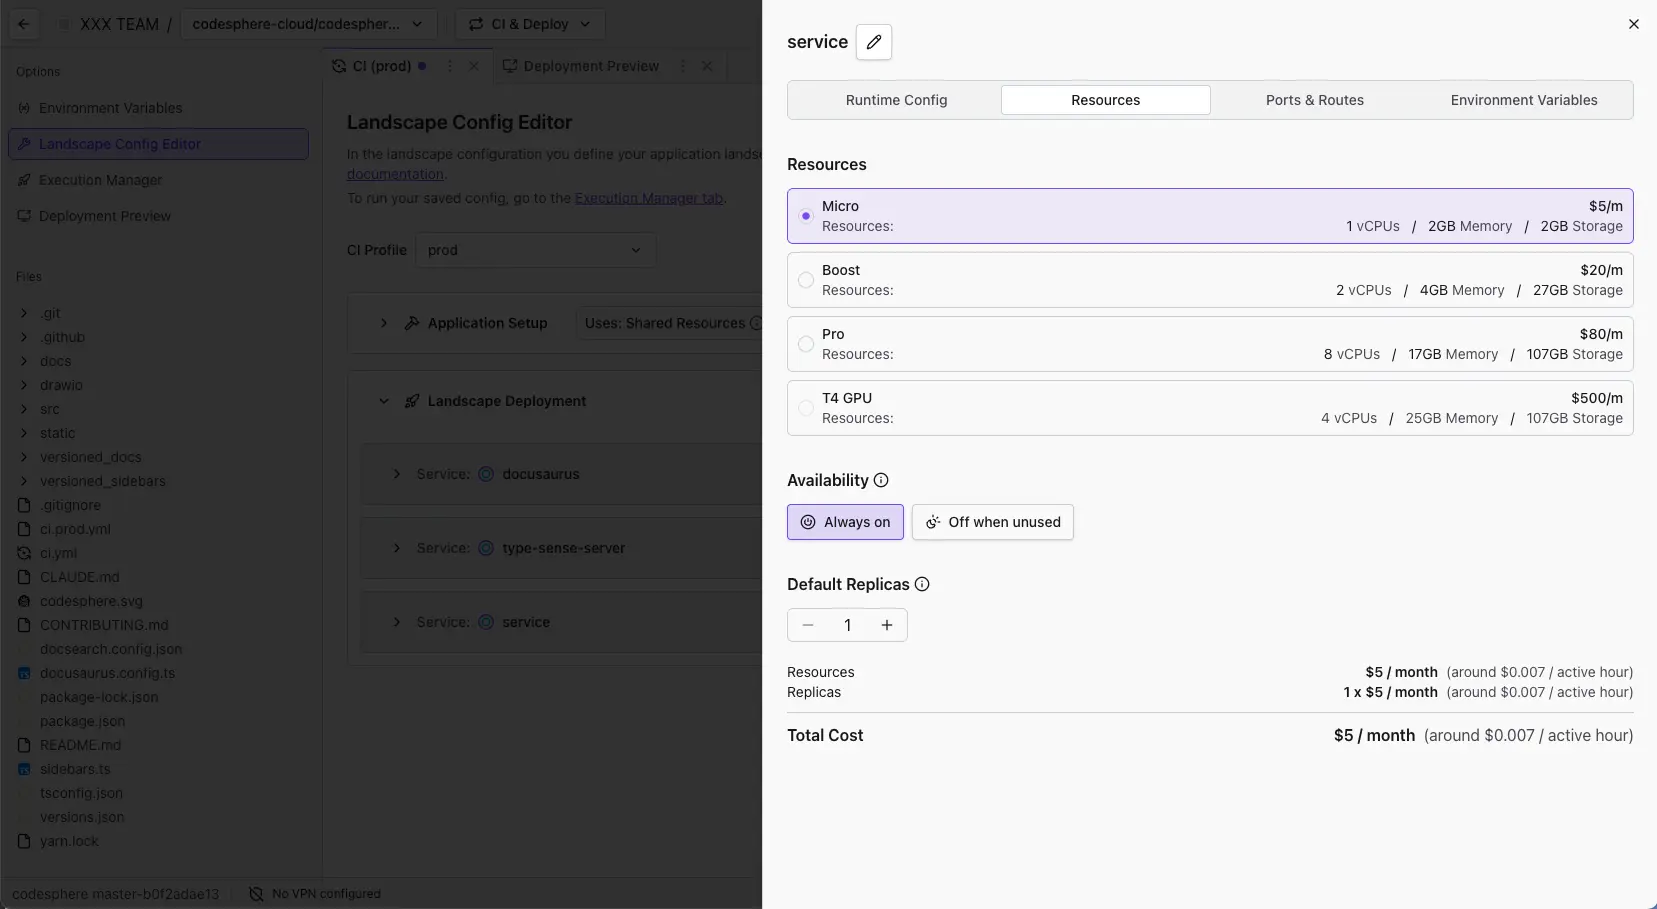
Each service has a resource plan that determines the vCPUs, memory, and storage allocated to it. The available plans and their pricing are configured by your cluster administrator and may vary between installations.
To configure resources:
- Select a Plan from the list (each plan shows its vCPU, memory, and storage allocation)
- Set the Availability mode:
- Always on: The service runs continuously, ideal for production workloads
- Off when unused: The service automatically stops after a period of inactivity and restarts when the domain or workspace is accessed, great for preview deployments or development environments
- Set the Default Replicas count for horizontal scaling using the
−/+controls
The screenshot shows a cost summary at the bottom with per-resource and total monthly cost estimates. Note that this may not be visible on all installations.
For details on how plans are defined and customized, see the Plans Configuration article.
Scaling strategies:
| Type | Description | Best For |
|---|---|---|
| Vertical Scaling | Increase vCPUs/memory by selecting a higher plan | Compute-intensive or memory-intensive workloads |
| Horizontal Scaling | Add multiple replicas of the same service | Handling increased request volume |
run:
  api-server:
    plan: 21        # Resource tier (determines CPU/memory)
    replicas: 3     # Number of instances
    steps:
      - name: Start Server
        command: node server.js
- plan: The resource tier ID that determines CPU and memory allocation.
- replicas (optional): Number of service instances for horizontal scaling. Defaults to 1.
For development environments, smaller plans with "Off when unused" enabled provide significant cost savings. Reserve larger plans and multiple replicas for production workloads.
Ports & Routes
- UI
- YAML
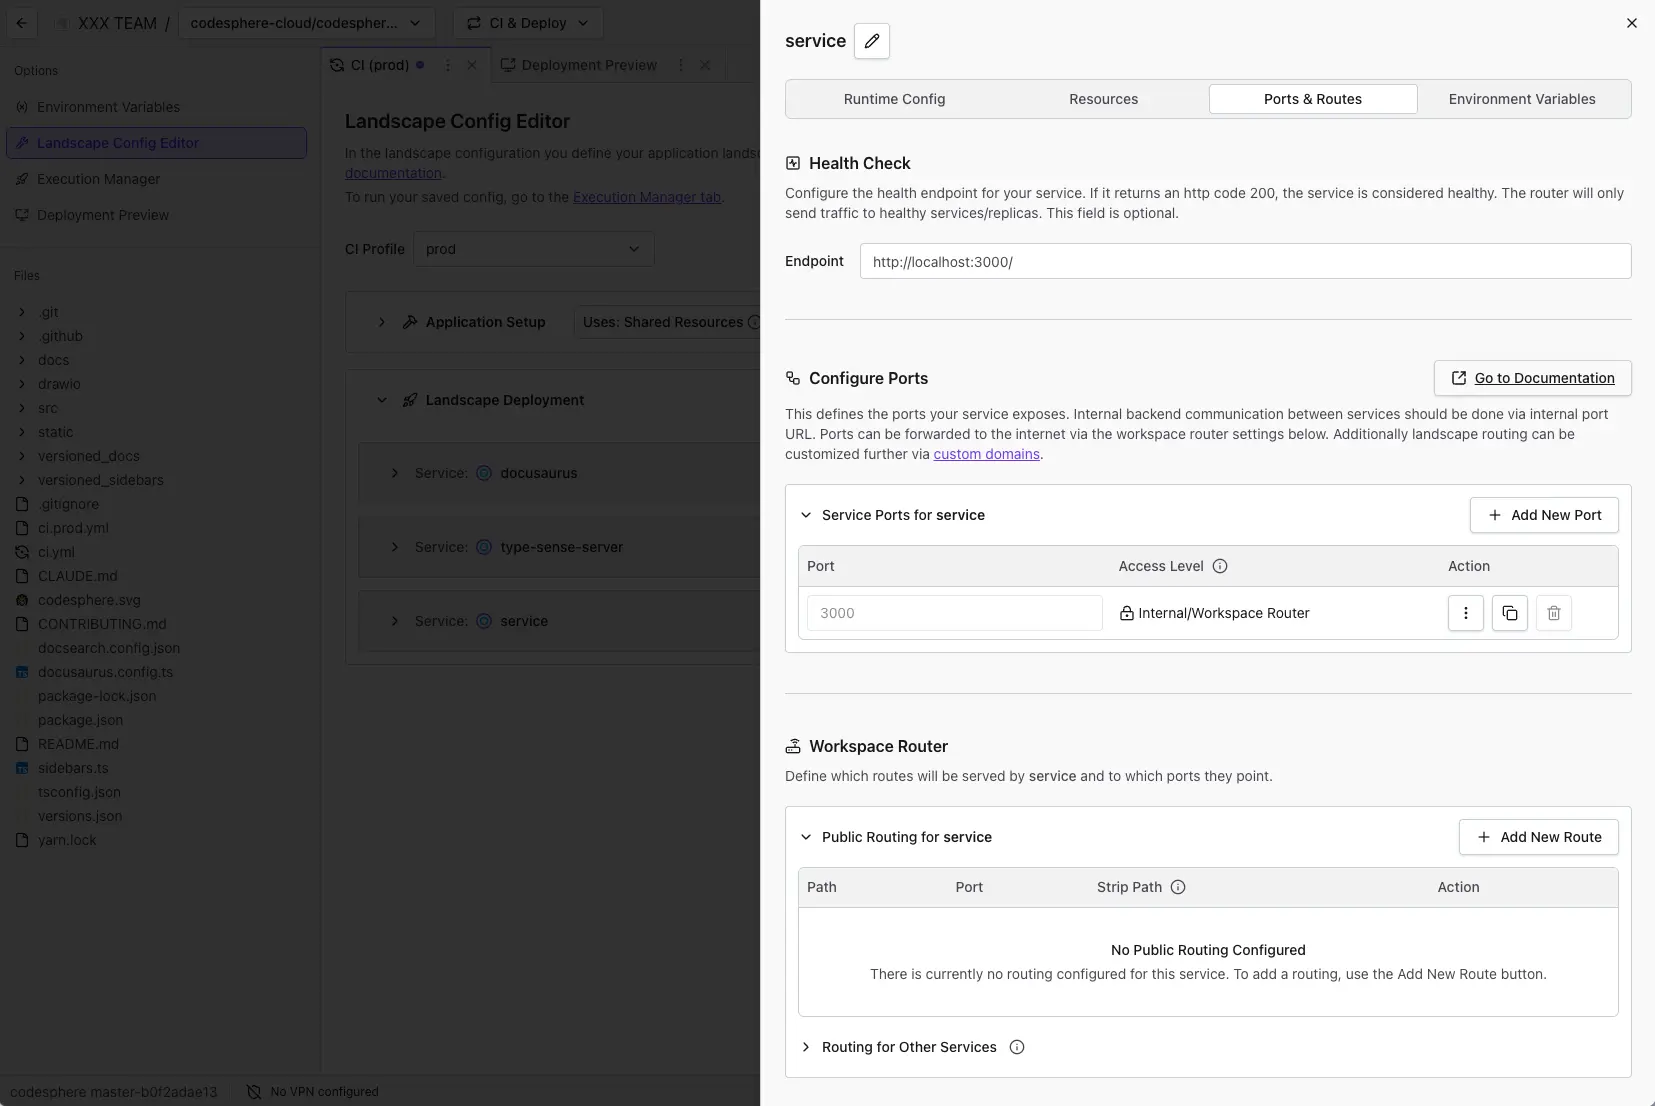
Health Check
By default, the Landscape Router pings your Reactive services on port 3000 to check their health. You can configure a custom health endpoint, e.g. http://localhost:8080/health, if your application uses a different port or path for health checks.
Every service needs at least one route defined. Without a route, the Workspace Router does not pick up the service — it will not be considered healthy and will not be reachable from outside the Landscape.
Configure Ports
This section defines the ports your service exposes. Internal communication between services should use internal port URLs, while ports can be made accessible through the Workspace Router below. Routing can also be customized further via custom domains.
Reactives within a Landscape communicate using internal URLs: http://ws-server-[WorkspaceId]-[serviceName].workspaces:[port]. You can copy a service's internal URL from the Copy button on the right-hand side.
To expose a new port:
- Click + Add New Port on the right side
- Enter the Port number your application listens on
- Optionally, you can expose a Public Port URL via the action menu (three-dot icon) on the port row. This directly exposes a public URL for the port, which can be copied via the context menu. This is less secure than using path routing and typically only needed in older legacy frameworks.
Workspace Router
Routes map incoming HTTP requests to your services based on URL path prefixes. The router also supports a Strip Path option that removes the matched prefix before forwarding the request to your service.
To add a route:
- Click + Add New Route
- Enter the Path prefix (e.g.,
/,/api,/admin) - Select the Port to route traffic to
- Optionally enable Strip Path to remove the prefix before forwarding
The Routing for Other Services section at the bottom shows routes defined by other services in the same Landscape, which is helpful for spotting conflicts or getting an overview of the full routing table.
run:
  backend:
    healthEndpoint: http://localhost:8080/health
    network:
      ports:
        - port: 8080
          isPublic: false
      paths:
        - port: 8080
          path: /api
    steps:
      - command: npm run start:backend
- healthEndpoint (optional): Custom health check URL. Defaults to
http://localhost:3000/. - network.ports: List of ports the service exposes. Set
isPublic: trueto expose a direct public URL (not recommended). - network.paths: Maps URL path prefixes to ports for the Workspace Router.
Example routing configuration:
| Path | Service | Description |
|---|---|---|
/ | frontend | Main application UI |
/api | backend | REST API endpoints |
/ws | websocket-server | WebSocket connections |
Environment Variables
- UI
- YAML
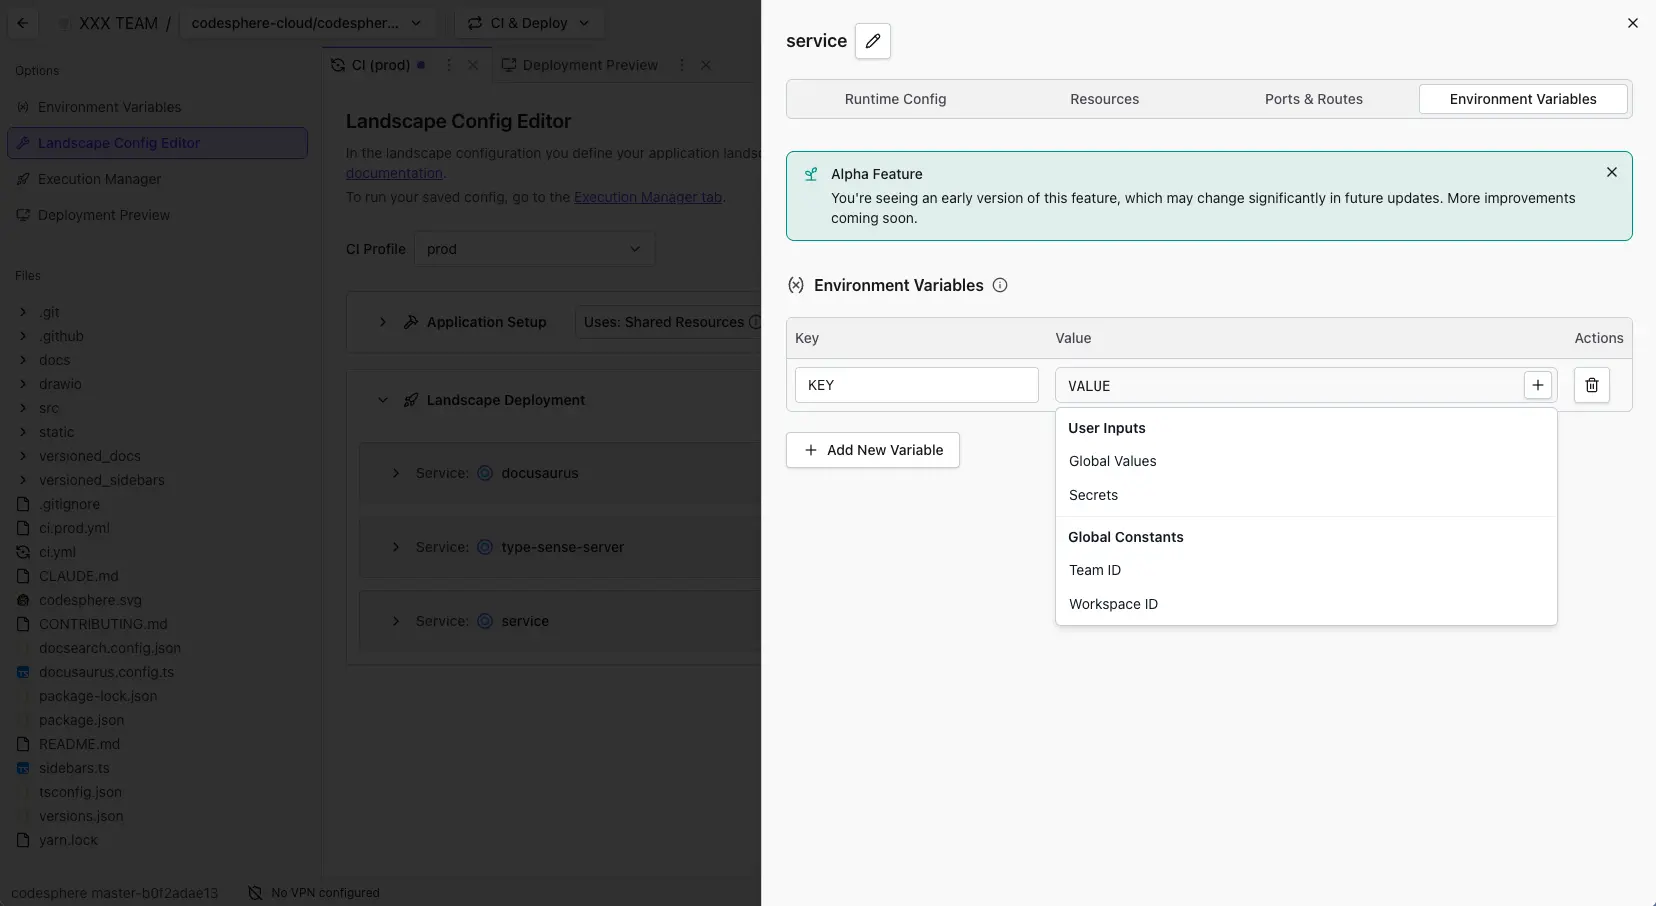
Environment variables let you pass configuration to your services without hardcoding values. They are injected at runtime.
To add environment variables:
- Open the Environment Variables section in the service configuration
- Click + Add New Variable
- Enter the Key (variable name)
- Enter the Value, either as plain text or by selecting from the dropdown categories: User Inputs, Global Values, Secrets, Global Constants, Team ID, or Workspace ID
For more details, see Environment Variables.
run:
  my-service:
    env:
      NODE_ENV: production
      SECRET_KEY: ${{ vault.secretFoo }}
      DB_PASSWORD: ${{ vault.dbPassword }}
      PG_USER: ${{ workspace.env['BACKEND_PG_USER'] }}
- env: Key-value pairs injected as environment variables at runtime.
Template syntax for values:
| Template | Description |
|---|---|
${{ vault.NAME }} | References a secret from the Codesphere vault |
${{ workspace.id }} | Resolves to the Workspace ID |
${{ team.id }} | Resolves to the Team ID |
${{ workspace.env['KEY'] }} | References a global workspace environment variable |
Secrets are stored encrypted and only injected at runtime. See Secret Management for details.
Managed Containers
Managed Containers are Reactives at their core, but let you bring your own Docker image instead of using the Codesphere-maintained base image. This means you get the same platform orchestration, networking, and monitoring while running a custom container. For a detailed overview, see Runtimes.
To add a Managed Container, select Managed Container from the service type picker.
- UI
- YAML
Base Image Configuration:
- Enter the full image reference (e.g.,
nginx:1.25-alpine,node:20-slim) - For private registries, ensure appropriate credentials are configured
Run As User/Group:
- Set User ID (
runAsUser) to define which user account the service runs as inside the container. - Set Group ID (
runAsGroup) to define which user group the service belongs to inside the container. - These control file access and process-level permissions and should match the ownership expectations of your application and mounted files.
Managed Containers have startup times in the seconds range (vs milliseconds for Reactives) due to image pulling and initialization. Actual speed depends on image size and network performance to the registry.
All other configuration options (resources, ports, routes, environment variables) work the same as for Codesphere Reactives — see the sections above.
run:
  nginx-server:
    baseImage: nginx:1.25-alpine
    plan: 21
    steps:
      - command: nginx -g "daemon off;"
    healthEndpoint: http://localhost/
    network:
      ports:
        - port: 80
          isPublic: false
      paths:
        - port: 80
          path: /
    env:
      NGINX_HOST: example.com
    runAsUser: 1000
    runAsGroup: 1000
- baseImage: The Docker image to use (e.g.,
nginx:1.25-alpine,node:20-slim). - runAsUser / runAsGroup (optional): Set the user and group ID the container runs as.
- All other fields (
plan,steps,network,env, etc.) work the same as for Reactives.
Cloud Native Deployments
Cloud Native Deployments provide a virtual managed Kubernetes cluster with full kubectl access, designed for advanced orchestration scenarios. For a detailed overview, see Runtimes.
This runtime is aimed at users with prior Kubernetes experience. If you're new to container orchestration, consider starting with Codesphere Reactives or Managed Containers.
Set up a Cloud Native Deployment
- UI
- YAML
- Provision the cluster: Add a virtual Kubernetes cluster from the Managed Services section of the UI or API. Note that each team can only have one virtual cluster at a time.
- Access the cluster: Once provisioned, retrieve the kubeconfig from the API to connect using
kubectl. - Deploy workloads: Use
kubectlcommands in the prepare or run steps, or interact directly via the terminal.
Deploy K8s Manifests via kubectl:
prepare:
  steps:
    - name: Deploy Application
      command: |
        kubectl apply -f k8s/deployment.yaml
        kubectl apply -f k8s/service.yaml
Deploy a Helm Chart:
prepare:
  steps:
    - name: Deploy with Helm
      command: |
        helm repo add corp42 https://charts.corp42.net
        helm repo update
        helm install my-release corp42/my-awesome-app -n app --create-namespace -f values-codesphere.yaml
Platform Integration
Deep lifecycle integration into the Codesphere ci.yml is currently a work in progress. Available features:
| Feature | Status |
|---|---|
| Virtual cluster provisioning | ✅ Available |
| kubectl access | ✅ Available |
| Helm deployments | ✅ Available |
| Monitoring integration | Manual configuration required |
| Networking integration | Manual configuration required |
For full platform features (automatic monitoring, integrated networking, off-when-unused), use Reactives or Managed Containers.
Managed Services in Landscapes
While you can create standalone Managed Services that persist indefinitely, for many use cases it is best practice to define Managed Services as part of your Landscape configuration. This ensures that your application environments are self-contained and reproducible.
For example, when you spin up a Development or Staging Landscape, Codesphere can automatically provision a dedicated PostgreSQL database for that specific environment, and tear it down when the Landscape is no longer needed.
Adding a Managed Service to a Landscape
You can define Managed Services in your ci.yml (or specific CI Profile like ci.dev.yml) using the Landscape Config Editor or by editing the YAML file directly.
- UI
- YAML
- Select Type: Choose **Databases & More ** from the dropdown/modal.
- Choose Provider: Select the service you need (e.g., PostgreSQL, Redis, S3).
- Configure: Set the version, plan, and configuration parameters.
- Name: Give the service a logical name (e.g.,
primary-db). This name will be used to reference the service within your Landscape.
- Name: Give the service a logical name (e.g.,
- Secrets: Define the secrets required by the service (e.g., passwords). You can reference project-level secrets or generate new ones.
- Save: The service is now added to your Landscape profile. It will be provisioned the next time you deploy this Landscape.
You can define Managed Services in your ci.yml file. This is useful for "Infrastructure as Code" practices. The UI will also generate this YAML for you, but you can also write it manually if you prefer.
-
Edit Profile: Click Edit as File in the top right corner and edit the profile definition to add a new service to the
runsection. This example defines a PostgreSQL database.schemaVersion: v0.2
# ... existing prepare and run stages ...
run:
my-postgres-db:
provider:
name: postgres
version: v1
plan:
id: 0
parameters:
storage: 10000
cpu: 5
memory: 500
config:
version: "17.6"
userName: "${{ workspace.env.pgUser }}"
databaseName: "${{ workspace.env.pgDb }}"
secrets:
userPassword: "${{ vault.pgPassword }}"
superuserPassword: "${{ vault.pgSuperuserPassword }}"- Key (e.g.,
my-postgres-db): The name and unique identifier for this service in the Landscape.warningRenaming a service requires the system to recreate it, which could lead to data loss. Proceed with caution here.
- provider: The type of service (matches the provider name in the catalog).
- secrets: Can reference Codesphere vault-secrets using
${{ vault.NAME }}syntax.
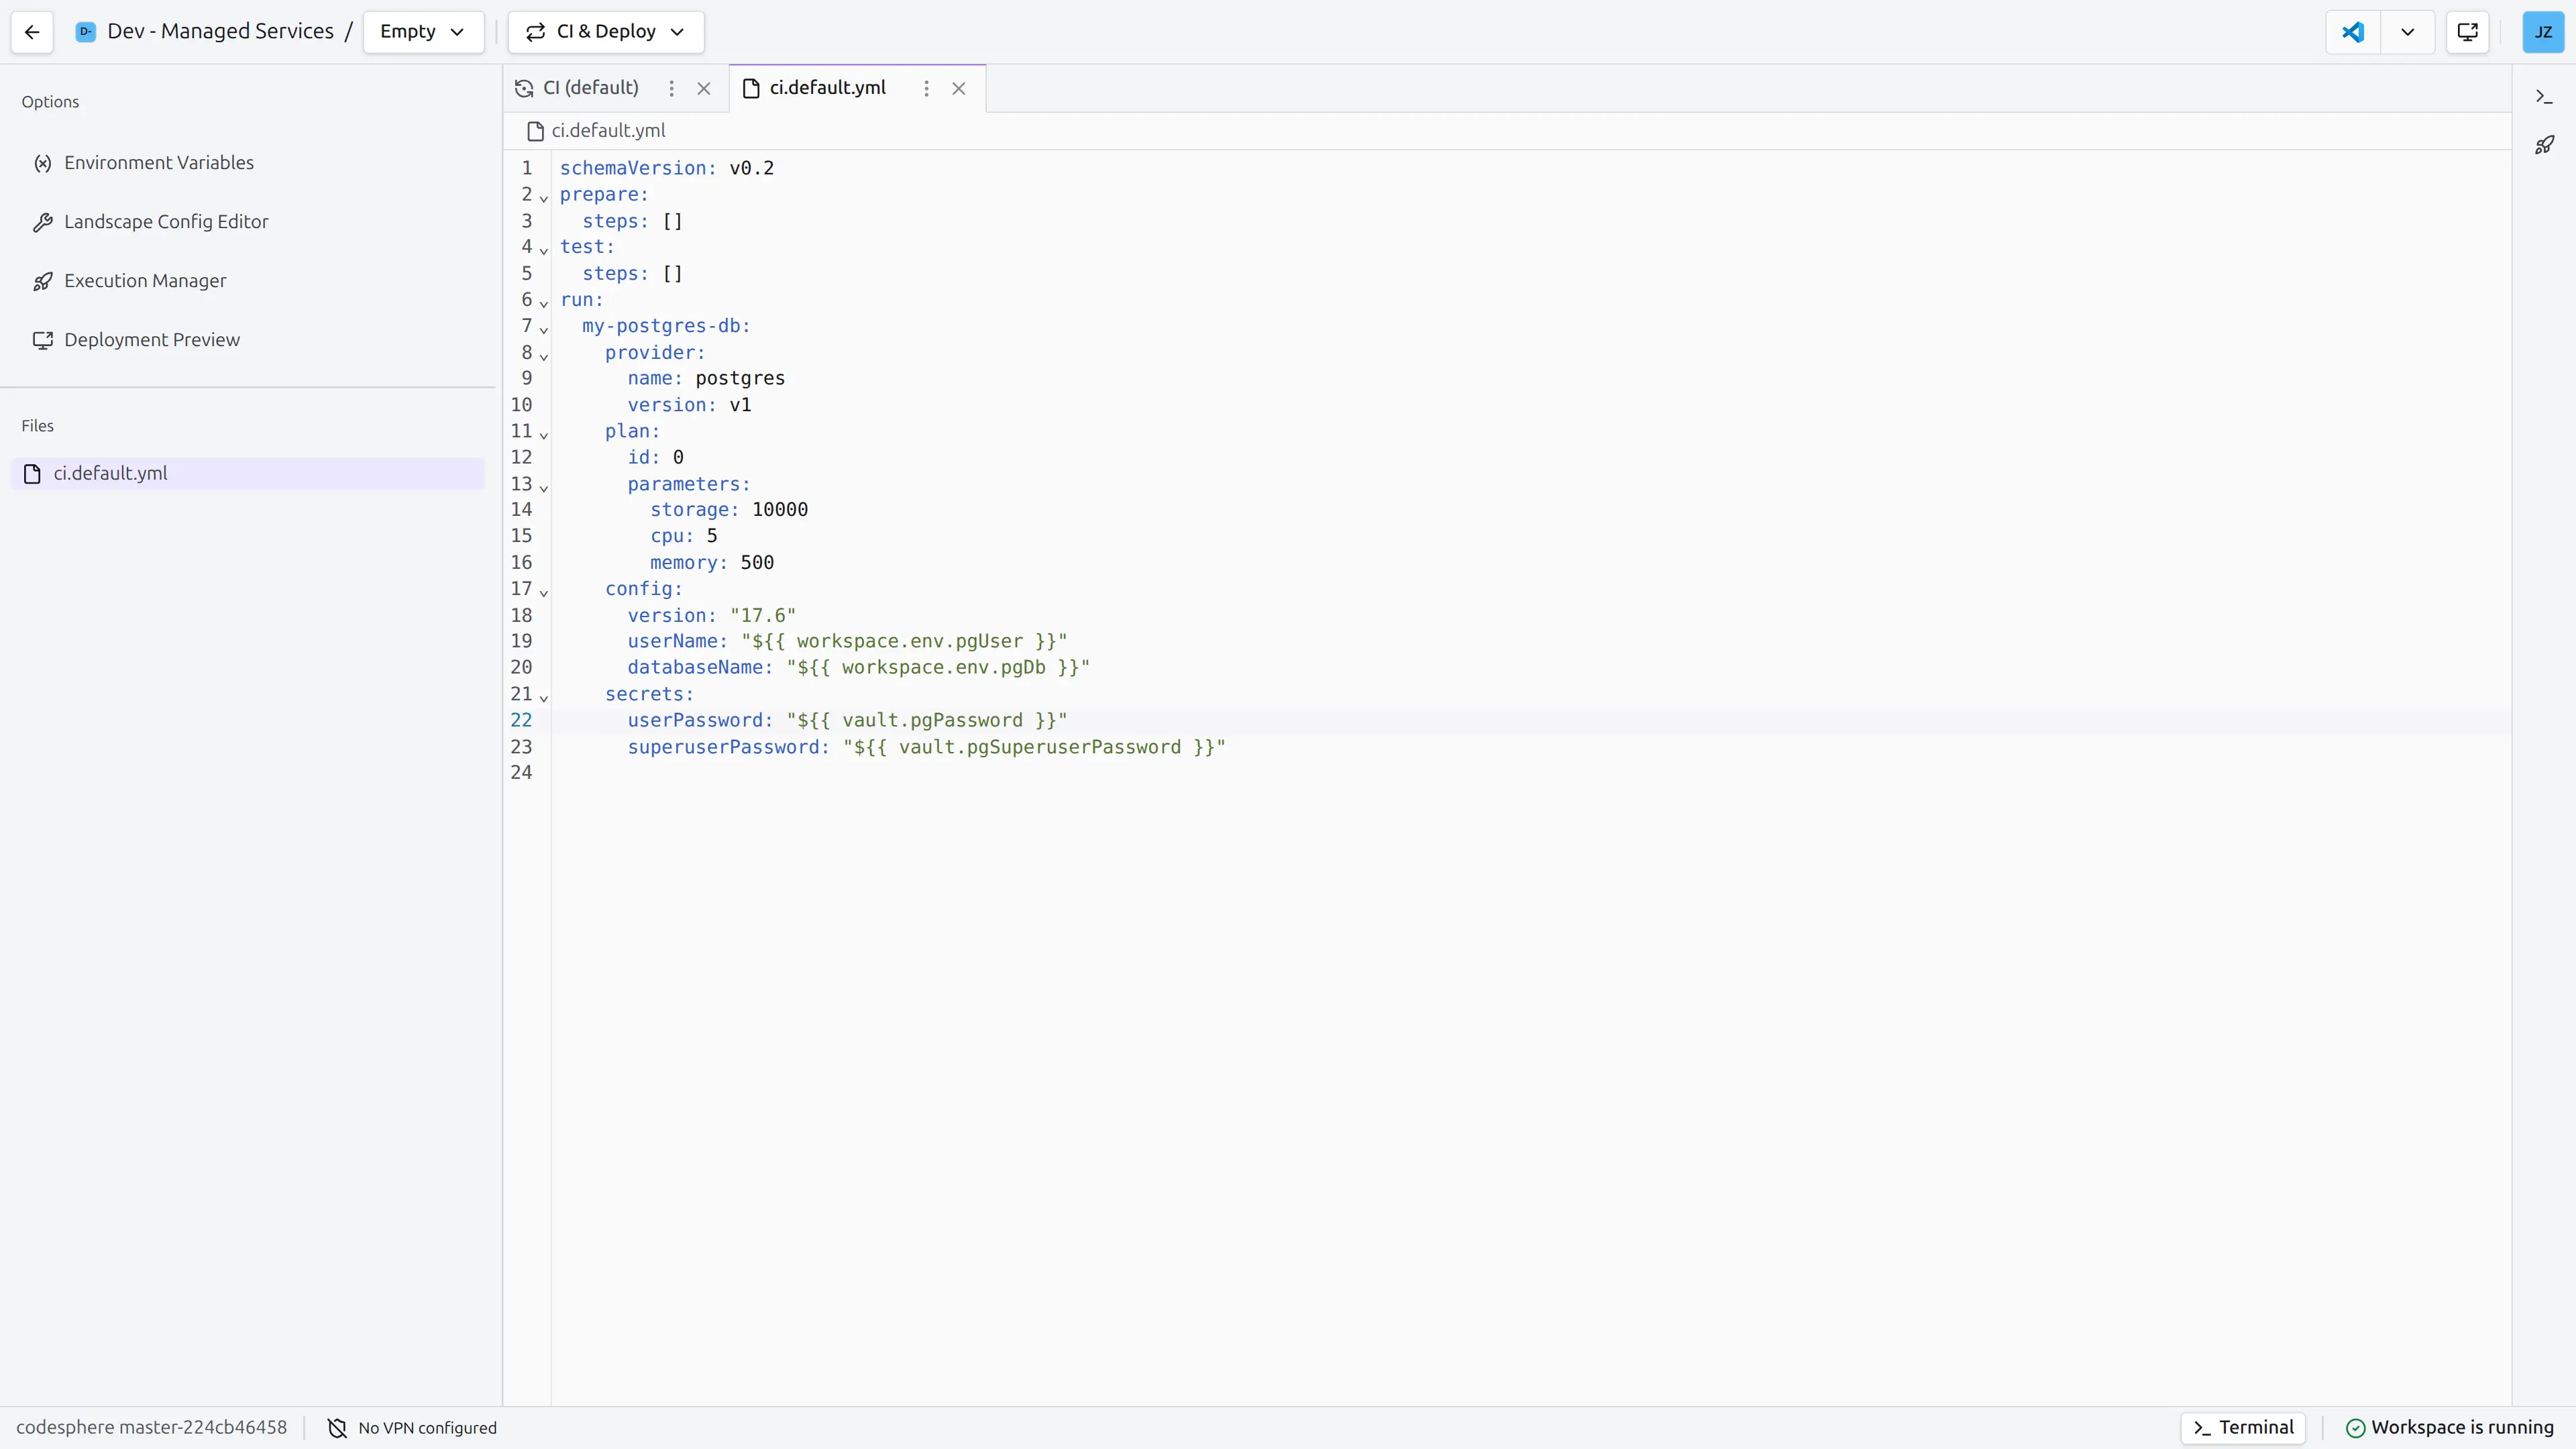 info
infoThe Managed Service definition must use a valid provider configuration for the service you're deploying (e.g., plan IDs, versions, and config parameters). You can find the allowed values by calling the
get providerendpoint in the Codesphere Public API or creating the initial scaffolding through the UI before editing theYAMLfile manually. - Key (e.g.,
-
Save: Save the profile (Ctrl + S or Cmd + S)
-
Sync Landscape: Go to the Execution Manager tab and click Sync Landscape in the top middle of the Landscape Deployment section. Confirm resource usage. This will apply the changes to the profile and trigger provisioning of the Managed Services.
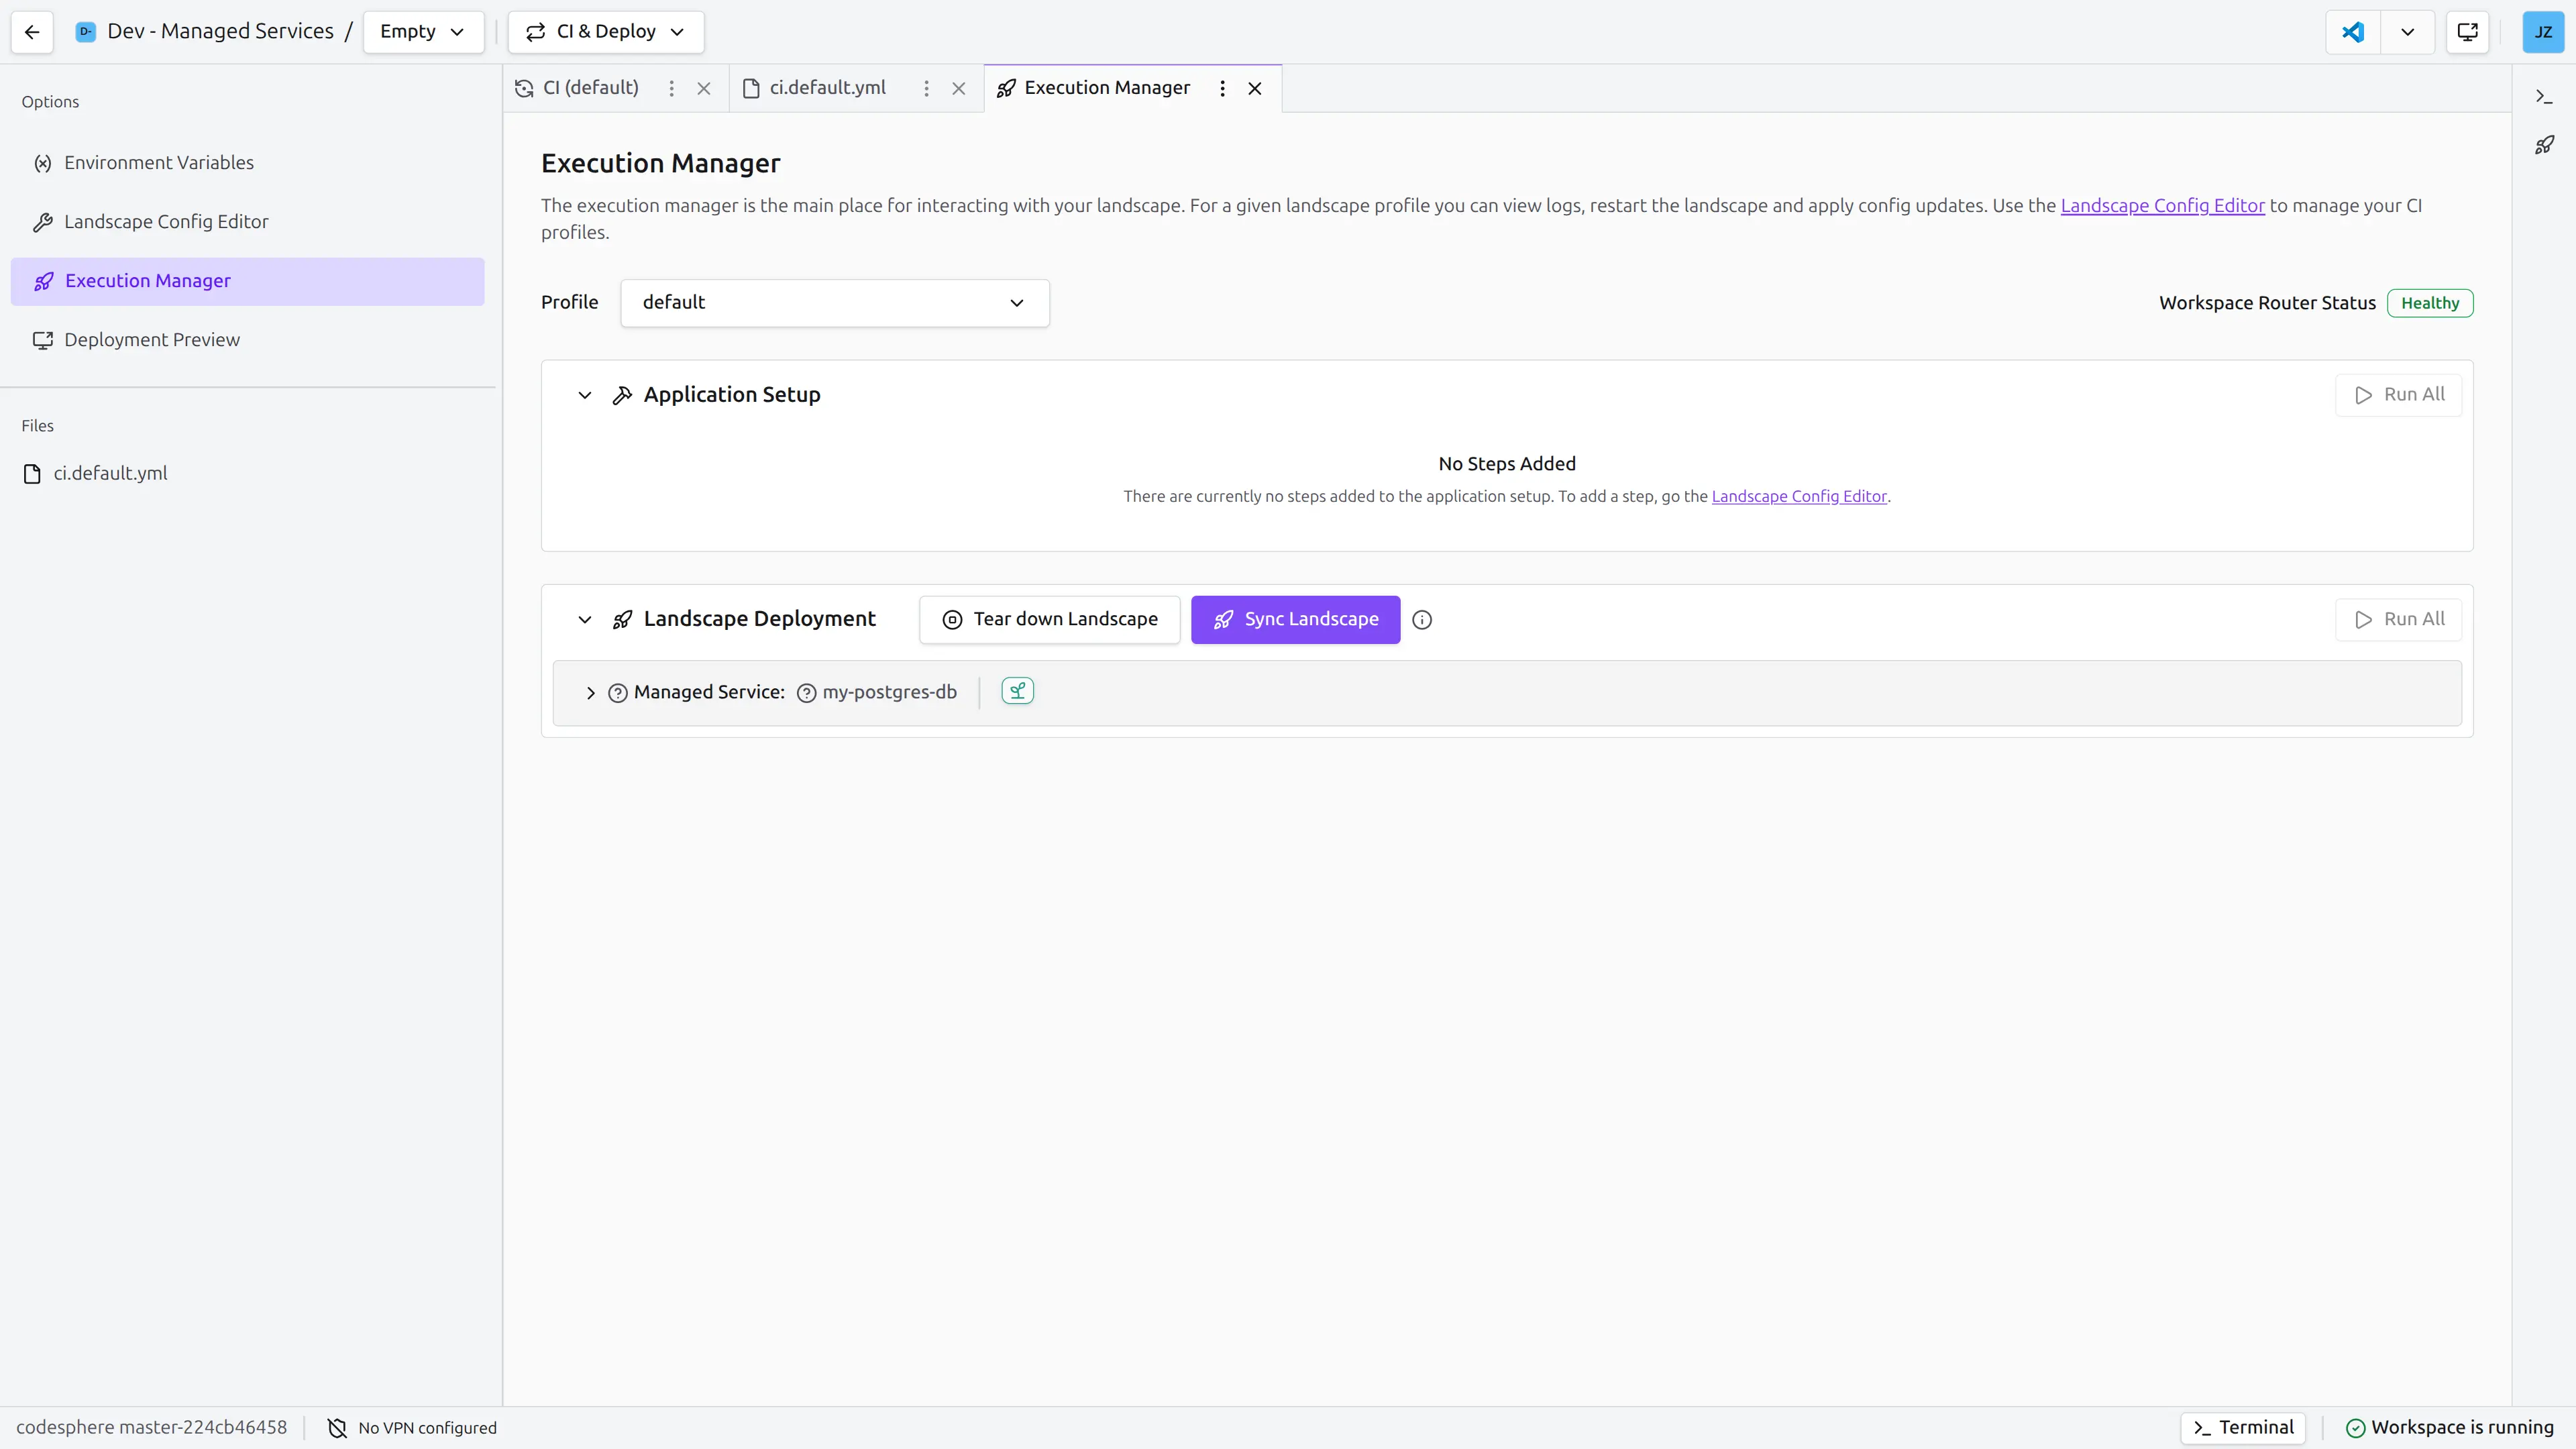
-
Secrets: Enter the necessary secrets that you used earlier to define the Managed Service. In this example,
pgPasswordandpgSuperuserPassword. These will be securely stored in the Codesphere vault and injected into the service when it is provisioned.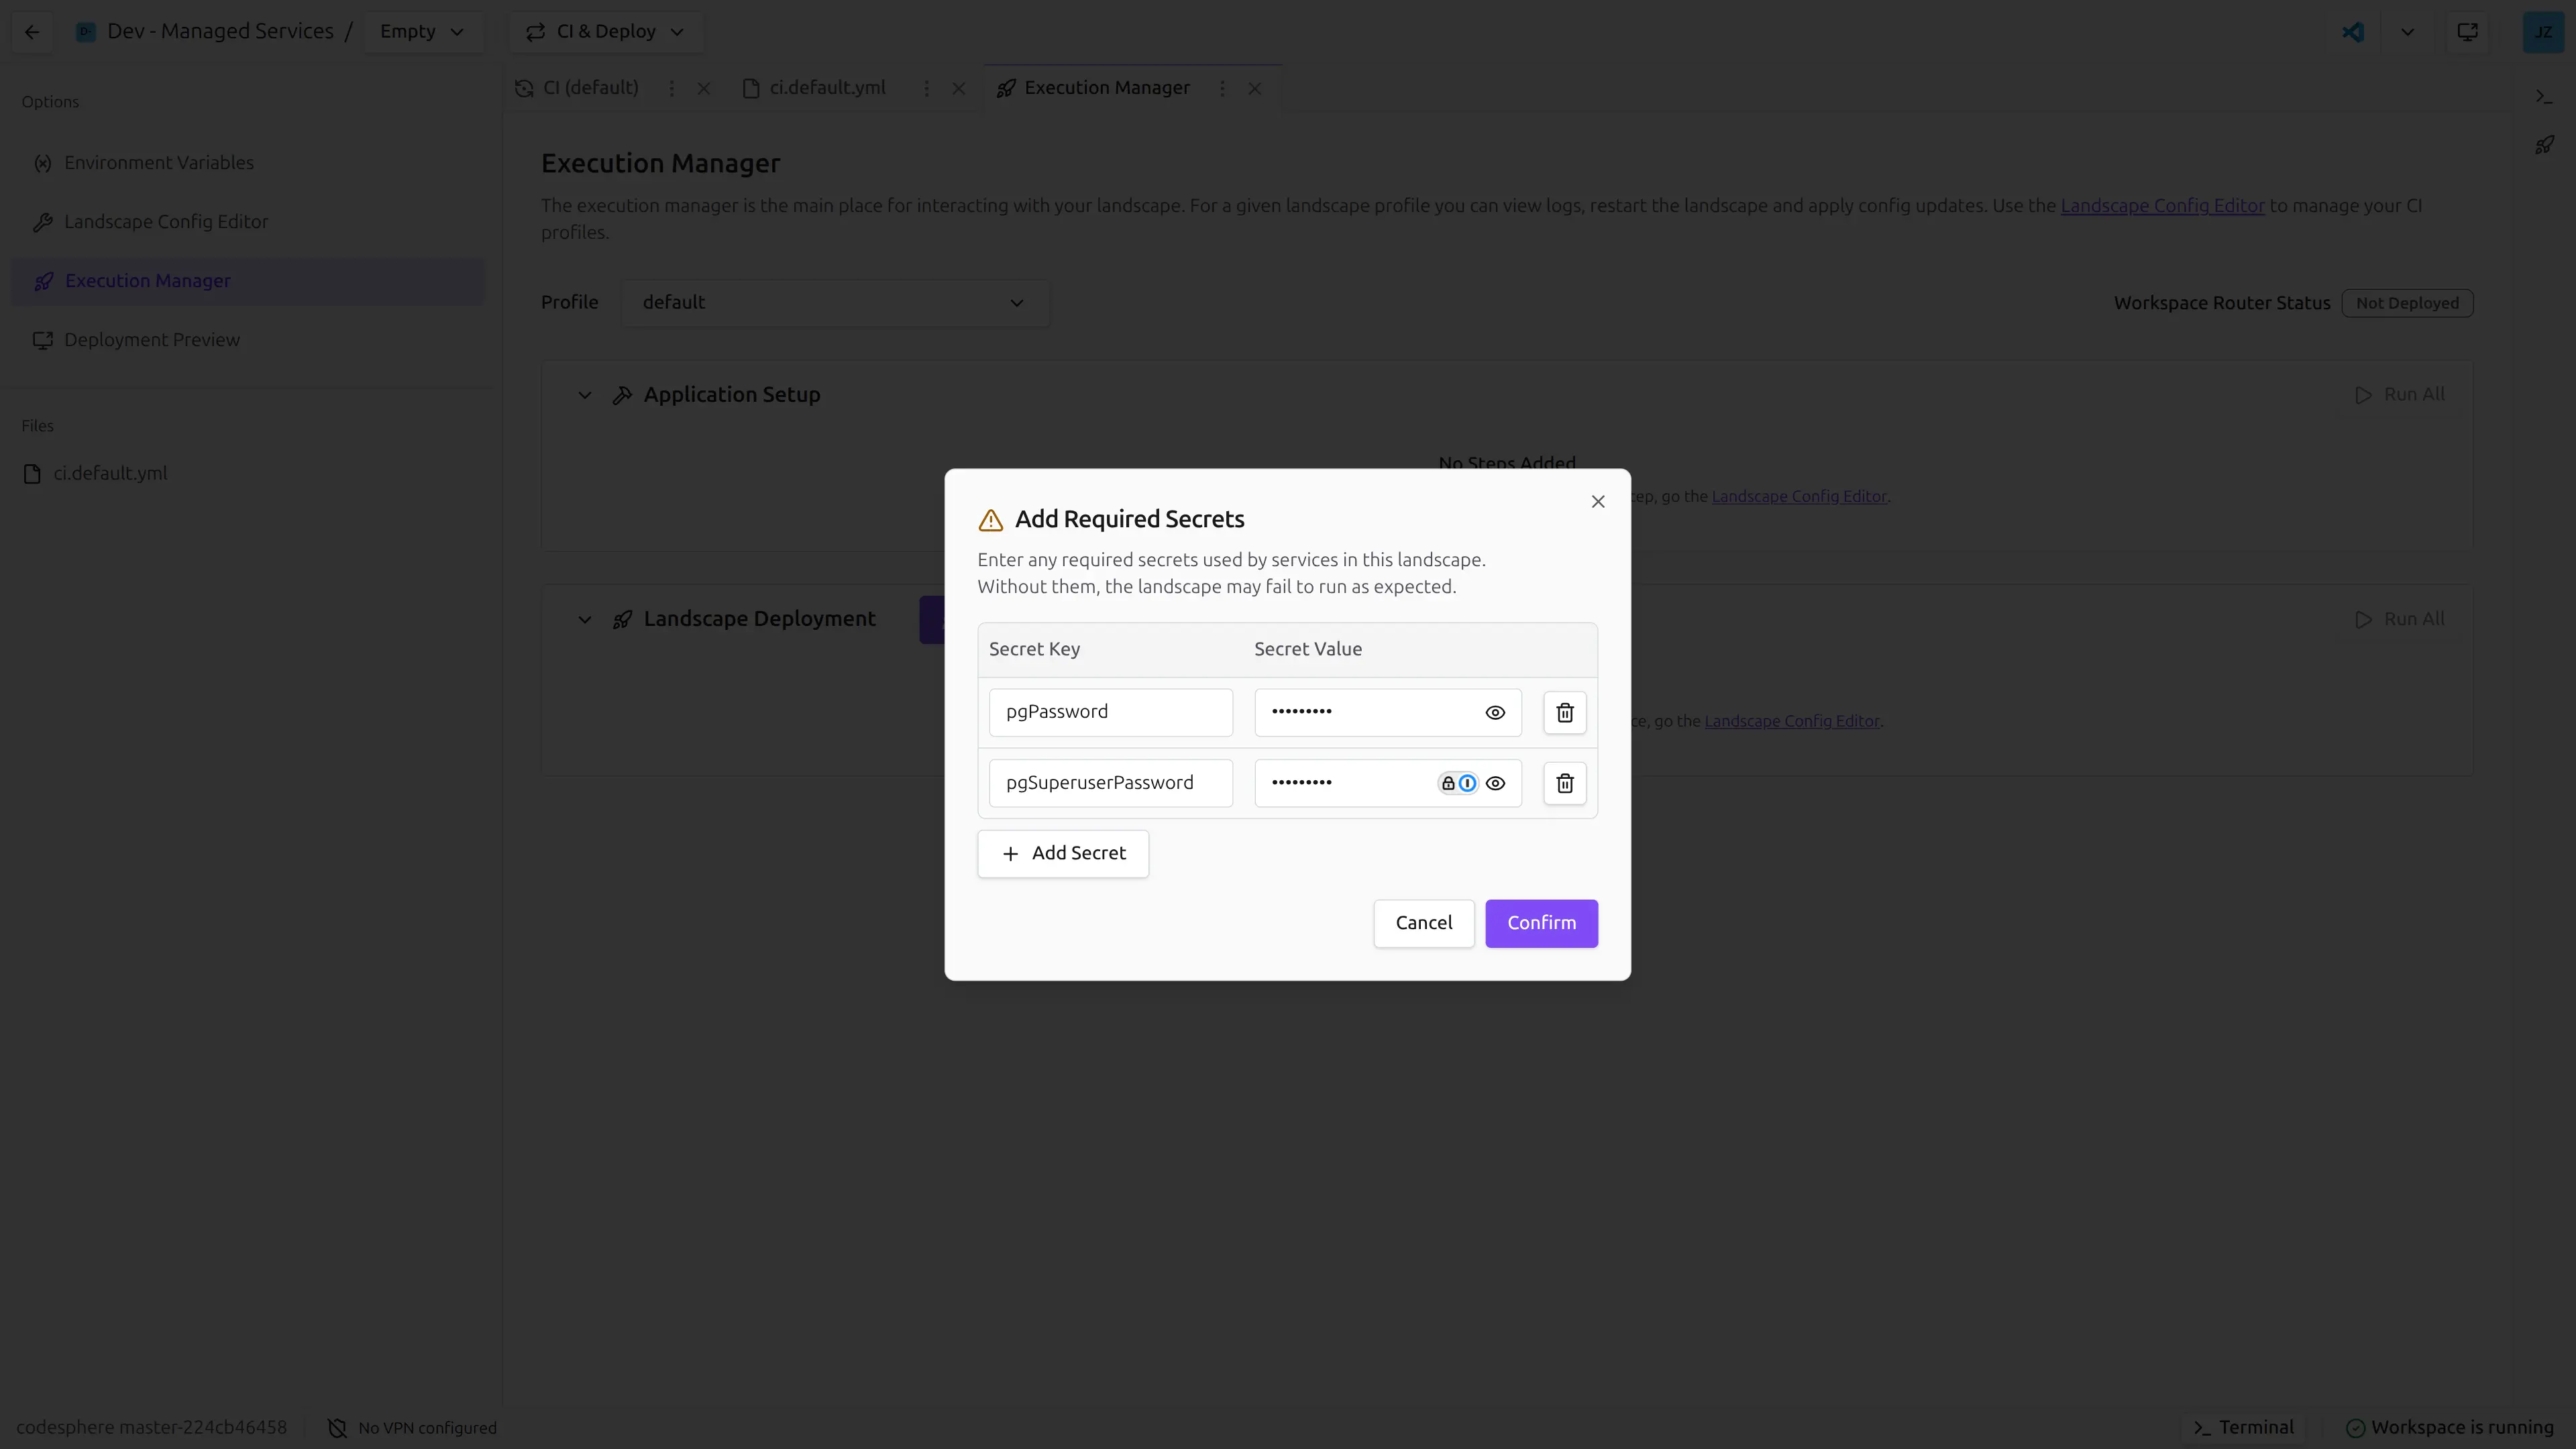
The service will now be created and available for your application to connect to when you deploy this Landscape.
Connecting to the Service
Once a Managed Service is provisioned, your application needs to connect to it. See Connecting to Services for detailed connection methods.
Service Discovery & Environment Variables
Codesphere allows you to inject connection details into your application using Environment Variables.
- Secrets: You can pass the secrets defined in the Managed Service directly to your application's environment variables.
- Hostnames: The host name of your Managed Service is deterministic and derived by the following template:
`ms-${providerName}-${providerVersion}-${teamId}-${serviceName}`
    .toLowerCase()
    .replaceAll(/[^a-z0-9-]/g, '-')
Lifecycle Management
- Creation: The Managed Service is created when the specific Landscape Profile (e.g.,
dev) is deployed. - Updates: Changes to the
ci.ymlconfiguration (e.g., changing the plan or config) will update the service on the next deployment. - Pause: If the Landscape supports "Off when unused", the Managed Services may also be paused to save costs (depending on the service capabilities).
- Deletion: When the Landscape is deleted, the associated Managed Services are automatically destroyed, preventing orphan resources and extra costs.
Renaming a managed service in the ci.yml file requires the system to recreate it, which could lead to data loss.
Differences from Standalone Services
| Feature | Landscape Managed Service | Standalone Managed Service |
|---|---|---|
| Definition | Defined in ci.yml | Created via UI / API manually |
| Lifecycle | Tied to Landscape (created/deleted with it) | Independent (persist until manually deleted) |
| Use Case | Dev, Test, Review Environments | Production, Long-running Shared Databases |
| Configuration | Infrastructure as Code (Git-tracked) | Manual Configuration |