Connect a Private Network (VPN)
A common scenario for the usage of a vpn is an application running on Codesphere that needs to access services hosted in a private network. For example, connecting to an on-premise database your company's own datacenter. By setting up a VPN connection, you can securely bridge your application running in Codesphere with your private network, enabling your applications to communicate with internal databases, APIs, or other services as if they were on the same local network.
This guide walks you through creating an vpn configuration and connecting your Codesphere Workspaces to an vpn gateway using IPsec. Once set up, each replica of your workspace service will establish its own individual VPN connection to your vpn gateway.
Each server in your workspace acts as an independent VPN host/client, establishing its own secure connection to your private network gateway. This is not a traditional site-to-site VPN, instead, each replica of a workspace service maintains its own VPN tunnel. This architecture is necessary due to Codesphere's multi-tenant infrastructure, ensuring proper network isolation and security across different workspaces.

Requirements & Limitations
Requirements:
- Your VPN gateway must be reachable from the public internet and have a static public IP address.
- The gateway must support IPsec with IKEv1 or IKEv2.
- The Pre-Shared Key (PSK) must be configured identically on both the Codesphere VPN configuration and your gateway.
- IKE and ESP cipher suites must match exactly on both sides.
Limitations:
- Each workspace replica establishes its own individual VPN tunnel to your gateway. Your gateway must be configured to accept multiple concurrent connections from different source IPs.
- This is required to support dynamically adding and removing aplictions services and their replicas.
- This is a host-to-site setup, not site-to-site. Codesphere workspaces act as VPN clients, not as a network peer.
- Changing a VPN configuration restarts the VPN service on all connected workspaces, causing a brief network interruption.
- Its recommend to use a second vpn config with a duplicated workspace to allow for an zero downtime change.
Example Gateway Configuration
Your VPN gateway needs to be configured to accept incoming IPsec connections from Codesphere workspace replicas.
Below is an example strongSwan configuration (ipsec.conf) that is compatible with Codesphere's VPN setup.
conn workspaces
  keyexchange=ikev1
  type=tunnel
  authby=psk
  forceencaps=yes
  ike=aes256-sha256-modp2048
  esp=aes256-sha256-modp2048
  ikelifetime=1h

  leftid=1.2.3.4 # Public IP of the gateway
  left=%defaultroute
  lifetime=8h
  leftsubnet=0.0.0.0/0

  right=%any
  rightsourceip=10.200.0.0/24 # The internal source IP to use in a tunnel for the remote peer.

  auto=add
leftrefers to the gateway (your side).leftsubnet=0.0.0.0/0allows the gateway to route all traffic through the tunnel. In your private network this is usualy the subnet of your private network.right=%anyaccepts connections from any source IP, which is required since each workspace replica can connect from a different IP.rightsourceipdefines the IP pool assigned to connecting Codesphere clients.
Create the Configuration

- Navigate to the VPNs tab in your team dashboard.
- Click the + Create VPN button.
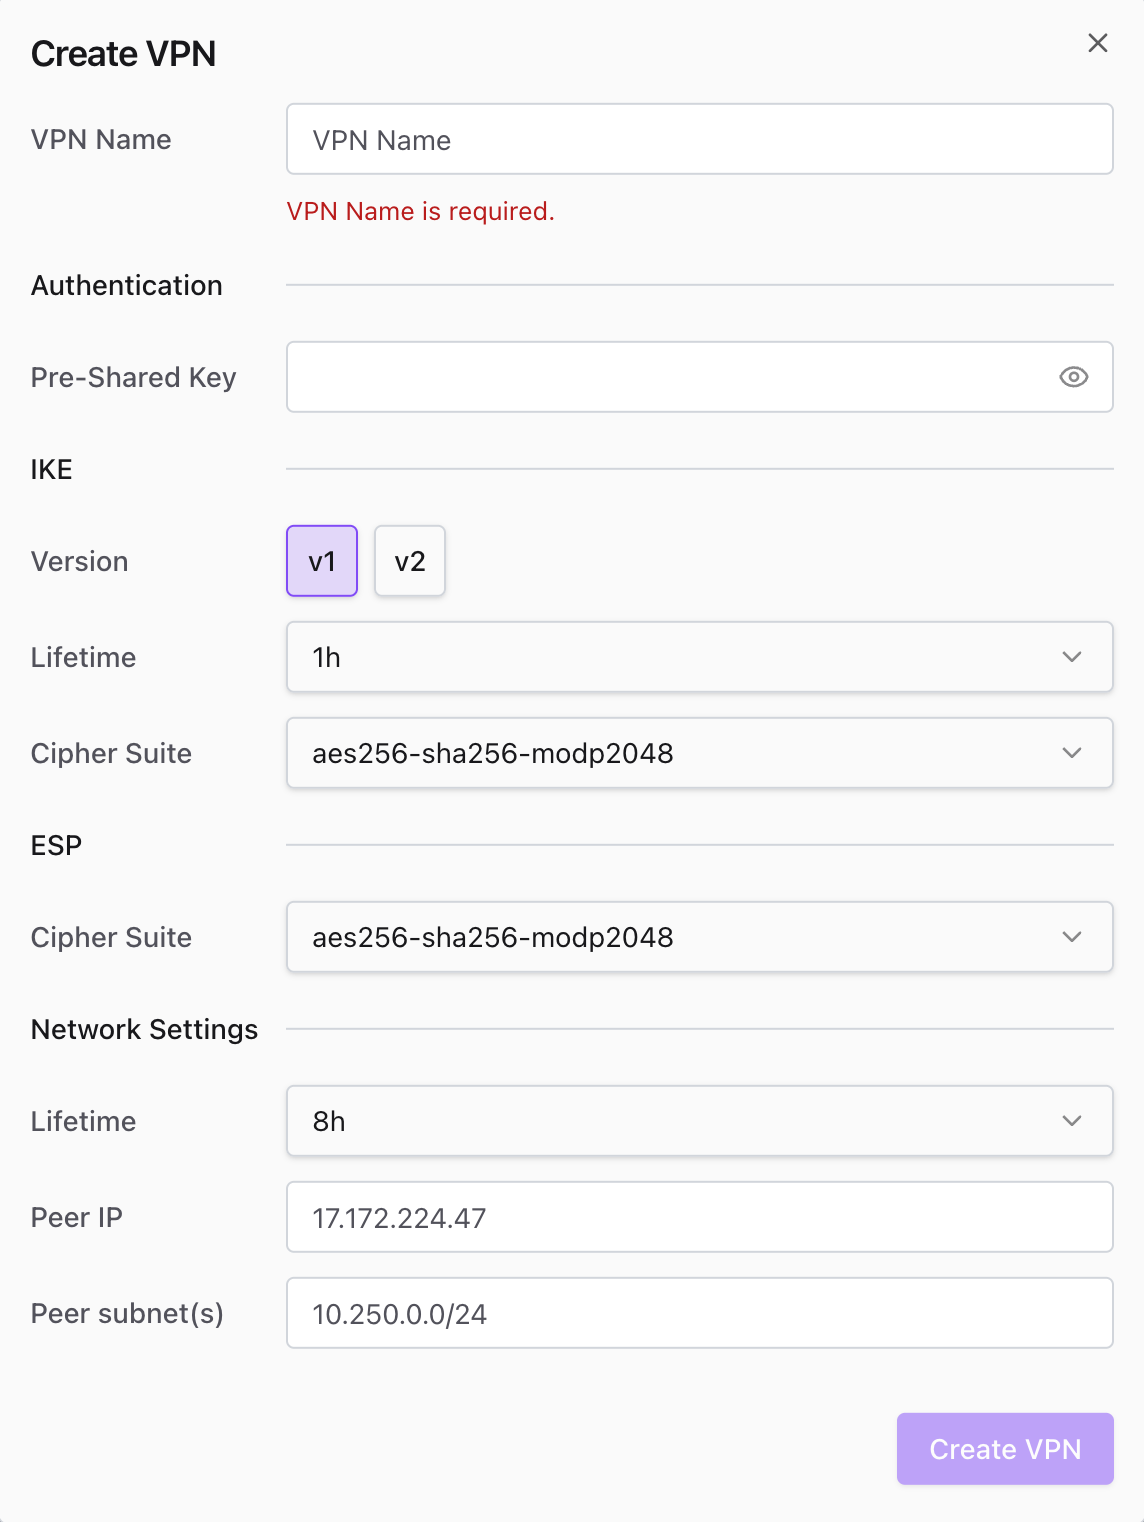
- Enter a Name for the connection.
- Input the Pre-Shared Key (ensure it matches your remote gateway).
- Configure IKE and ESP settings (Version, Lifetime, Cipher Suites).
Your IKE and ESP settings must exactly match the configuration on your external firewall or VPN appliance. Mismatched security phases are the most common cause of connection failures.
- Locate the "Network Settings" section.
- Enter the Peer IP (the public ip of your vpn gateway).
- Specify the Peer Subnet(s).
Use standard CIDR notation (e.g., 10.250.0.0/24) for the private IP ranges you need to access through the tunnel.
Make sure to not route all traffic (0.0.0.0/0) throught the tunnel since this will break Codesphere internal functionality and access to other services.
- Save the configuration.
Connect Workspaces
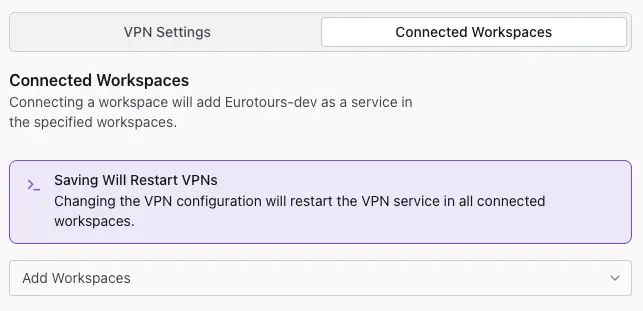
- Click on the newly created VPN name to open its details.
- Select the Connected Workspaces tab.
- Use the Add Workspaces dropdown to select the target Landscapes you want to connect to this VPN.
Changing the configuration will restart the VPN service on all connected workspaces. This may cause a momentary network interruption for existing connections.
Verify Connection
Once your workspaces are connected, you should test the tunnel to ensure traffic is routing correctly.
- Open the terminal in your Codesphere IDE.
- Ping a private IP address located within the Peer Subnet you defined earlier.
- Command example:
ping 10.250.0.5
- Command example:
- Confirm the ping succeeds to verify the tunnel is active and successfully passing traffic.
Preview Deployments via CI/CD
You can also associate preview deployments to existing VPN connections via our CI integrations for GitHub, Bitbucket, and GitLab. This enables you to comfortably work with private networks (like restricted on-premise databases or internal APIs) for your development environments.
To set this up, simply reference your VPN connection name in the deploy YAML of your repository.
- GitHub Actions
- GitLab CI
- Bitbucket Pipelines
Add the vpnConfig parameter under the with section in your deployment step.
- name: Deploy
  uses: codesphere-cloud/gh-action-deploy@main
  env:
    GITHUB_TOKEN: ${{secrets.GITHUB_TOKEN}}
  with:
    email: ${{ secrets.CODESPHERE_EMAIL }}
    password: ${{ secrets.CODESPHERE_PASSWORD }}
    team: 'My Team' # Change this to your team
    plan: 'Boost' # Select the plan for your app
    onDemand: 'true'
    vpnConfig: 'vpnConfigName' # Replace with your VPN connection name
Add the VPN_CONFIG variable to your deployment script variables.
codesphere-deploy:
  image: ghcr.io/codesphere-cloud/codesphere-monorepo/integrations/gitlab-ci:latest
  stage: deploy
  script:
    - /app/server
  variables:
    ACCESS_TOKEN: $CI_ACCESS_TOKEN
    EMAIL: $CODESPHERE_EMAIL
    PASSWORD: $CODESPHERE_PASSWORD
    TEAM: 'Demo'
    PLAN: 'Micro'
    ON_DEMAND: 'false'
    VPN_CONFIG: 'vpnConfigName' # Replace with your VPN connection name
Add the VPN_CONFIG variable to your deployment step variables.
- step:
    deployment: Test
    script:
      - pipe: docker://ghcr.io/codesphere-cloud/codesphere-monorepo/integrations/bitbucket-ci:latest
        variables:
          ACCESS_TOKEN: $ACCESS_TOKEN
          EMAIL: $CODESPHERE_EMAIL
          PASSWORD: $CODESPHERE_PASSWORD
          TEAM: 'My Team'
          PLAN: 'Micro'
          VPN_CONFIG: 'vpnConfigName' # Replace with your VPN connection name